Fall 2018 Workshop Cards

Memory Box Lamp Post Frame Card
Memory Box Holiday Lamp Post Frame & Pine Wreath
Gina K Connect glue
Silver Mirricard sparkle paper
Gold paper
1.
Assemble wreath using connect glue. *I made a
circle template as a guide for making the wreath.
2.
Fold card base in half and mount silver frame onto
the front of the card base.
3.
Mount a small piece of foam tape behind the
opening of the lantern. Add gold inlays (lantern lights) to the front on the
foam tape. Hang the finished wreath onto the lamp post and mount this center
scene into the center of the silver frame, on the card base.
4.
Using Versamark ink, stamp the greeting onto the
red cardstock strip. Mount red strip over the center of the wreath using foam
tape.

Sunny Studio Slider Window Card
Sliding Window Die by Sunny Studios
Flakey Friends stamp & die sets by Honey Bee Stamps
Copic Markers: E43, E44, BG10, BG93, YR04 & Y19
Brown ribbon
Gold Stickles
Snowflake paper by Authentique
Directions:
1.
Fold card base in half.
2.
Cut the slider window into the center of the
snowflake patterned paper. Using Iced Spruce Distress Oxide ink stamp a few
snowflakes randomly on this piece. Add scor-tape to the ¼” tab on the back side
of the snowflake paper on the bottom of the cutout. Mount a piece of cardstock
(3 ¾”X 4 7/8”) matching the card base to the ¼’ tab (centered and flush with
the bottom edge) Add foam tape around the three sides of the back, around the
slider cardstock piece. *Make sure it doesn’t touch the piece that slides.
Mount this piece onto the card base. Punch a 1/8” hole in the top center of the
slider piece and thread your ribbon through. *pulling on the ribbon should make
the slider open.
3.
Stamp all the images onto a piece of Solar White
cardstock using Memento Black Tuxedo ink. Color the images with the Copic
markers. Cut the images out using the matching dies. Cut out a hillside using
blue cardstock and a hillside die. * I used the set from Lawn Fawn.
4.
Build the scene on the on the snowflake
patterned paper that slides up, making sure to add the hill to the fold of the
¼” flap. * I added foam tape behind the hat and small present. Add gold
stickles to the star. Allow to dry.
5.
Pull the
ribbon up to expose the card base and using black ink, stamp the greeting on the bottom, just above the opening

Gina K Wreath Card
Fall Wreath Builder by Gina K
Distress Oxide pads: Fired Brick, Wild Honey, Forest Moss
& Gathered Twigs
Latticework embossing folder by Sizzix
Directions:
1.
Using the latticework embossing folder, emboss
the Patina cardstock. *run through twice matching up the pattern. Mount this
onto the card base.
2.
Do the wreath stamping on the cream colored
cardstock. *Using a MISTI tool for this technique is very helpful
3.
Using Gathered Twigs Distress and water mixture,
splatter over stamped leaves.
4.
Using Ground Espresso distress oxide ink, stamp
the greeting onto the right hand side of the burlap patterned paper strip.
Clear emboss and mount onto the brown cardstock strip. Mount this strip across
the center of the stamped piece.
5.
Add flowers & leaves on the middle left hand
edge of the burlap strip. Add brown pearls to the flower center.
6.
Mount the stamped piece onto the brown mat and
then add twine around this piece and tie a bow under the flower.
7.
Mount the matted stamped piece onto the center
of the card base over the embossed Patina cardstock.
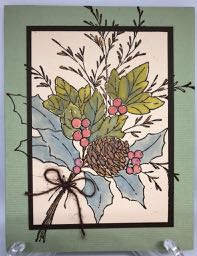
Penny Black Christmas
Materials Used:
Penny Black Christmas
Arrangement
Distress Ink – Ground Espresso
Clear Embossing Powder
Distress Oxide Inks – Iced
Spruce, Peeled Paint, Fired Brick, Vintage Photo
Cardstock: Balsa, Dark Brown, Bazzil
Pear
Brown Twine
Scrapbook Adhesives Micro
Adhesive Dots
Directions:
1. Position and fasten stamp in
Misti
2. Use Ground Espresso ink to
stamp image (repeat 3 times to get good impression and wet ink for embossing)
3. Heat emboss with clear
embossing powder.
4. Place folded card in Misti. Stamp image with Ground Espresso ink (only
necessary to ink edges). Repeat as needed. Set aside
4. Tap Distress Oxide ink pad on
craft sheet, tile or palette. Use small
amount with water to paint image as follows:
Holly Leaves – Iced Spruce
Other Leaves – Peeled Paint
Pine cone – Vintage Photo
Berries – Fired Brick
Suggest painting pine cone
first, then leaves and berries last.
5. Fasten to brown mat
6. Fasten to stamped card front
7. Fasten bow over stems

Bleached Card
Supplies:
8
½ x 11 Taylored Expressions Buttercream paper
Watercolor
paper
Black
embossing powder
Versamark
stamp pad
Distress
Oxide Aged Mahogany ink pad
Distress
Oxide Fossilized Amber ink pad
Cougar
white paper
Gina
K Diagonal Stripe Stamp
Pinkfresh
Studio Bloom Clear Stamp Set
Paint
brushes
bleach
Directions:
1. Cut
base out of Buttercream paper 4 ¾” x 9 ½”, cougar white 4 ¼” x 4 ¼” and
Watercolor paper 4” x 4”.
2. Use
the watercolor paper and take the Diagonal Stamp and ink with Aged Mahogany,
then stamp your watercolor piece, take and turn your watercolor piece and stamp
the other way with Fossilized amber, then heat set.
3. Next
use the versamark pad and ink up the Pinkfresh stamp and stamp the bloom in a
diagonal on the watercolor, then use the black embossing powder on top and heat
set.
4. Take
a paint brush and regular clean bleach and use on the stamp and paint on the
bleach on the leaves and flower and while painting on use a paper towel to lift
up the ink. Do as much as you want to
get the effect you like. Then take
sentiment and stamp on upper right.
5. Take
the cougar white and take the aged mahogany and use a dobber to go along the
edges about 1/2” in to make a border on
the white. Make it dark.
6. Assemble
– put the white border piece on base then take the watercolor piece and place
on top.

Alcohol Lift
Paper-Yupo regular for stamping cut to 4 x 5.25
Yupo translucent to
cut the stencil cut to 4.25 x 5.5 –Die is from Pink Fresh
Gold paper 4 1/8 x 5 5/8
Black paper cut to 4.25 x 5.5
Card base cut to 5.5. x 8.5 scored at 4.5
Alcohol ink: Stream,
wild Plum, Butterscotch
Alcohol Ink Lift re-inker
Dauber with both felt and sponge
Paper towel
Tag: white ¾ by 1
7/8 Black 7/8 x 2
Foam tape
Our Daily Bread Sympathy
Place the felt on the dauber. Using the three alcohol inks create three
circles on the felt with 4 to 5 drops of each color.
Daub the felt over the regular Yupo paper until it is
covered. Allow to dry
Cut the Yupo
Translucent with the die to create a stencil that can be reused. Place this over the inked paper.
Place the sponge on the dauber and add a good drop of the
Lift Ink in the center. Daub this over
the stencil. With a paper towel daub the
re-Inker off the paper with the stencil still in place. When it looks like the re-inker looks removed
take the stencil off and continue to daub the paper till all of the re-inker is
removed.
Layer the inked image onto gold and then to the black.
Stamp the sentiment
onto the white, mount onto the black and using foam tape adhere to the card.

Snowy Cottage
Penny Black Snowy Cottage and Christmas & Love stamps
Taylored Expressions mini snowflakes
Nuvo Glimmer paste
Moonstone and a small paint brush
Prismacolor pencils-903, 916, 911, 945
Paper: Royal Kraft,
Jelly Bean Green, Royal fiber Birch
Versafine Black
Cut the Royal fiber to 4 1/8 x 6 . Stamp
using the Versafine..
Color using the Prismacolor
pencils. To create a darker image
go over it again.
Using the Nuvo glimmer paste add snow to the roof of the
cottage, trees and ground
Put the snowflakes in the sky around the sentiment. These are cut from scraps of white.
Mount the stamped image on the green cut to 4.25 by 6.25
this is mounted to the card base.
The card base is
created with the Royal Fiber Kraft is cut
6.5 by 9 and scored at 4.5.

Our Daily Bread Bag
Supplies:
12
x 12 Authentique Nostalgia Six Paper
8
½ x 11 Fiber Birch
Taylored
Expressions Red
Our
Daily Bread Card caddy and Gift Bag die
Our
Daily Bread Handles & Topper Die
Our
Daily Bread Merry Christmas Caps Die
Poinetta
Die
Directions:
1. Cut
solid bag out of Authentique paper, then cut solid with die inside for front
out of Authentique paper, Next out of Birch paper cut the sides and
handle. Also then cut the little circle
out of the Authentique paper and the scalloped edge out of the Authentique
paper opposite side of what bag paper is.
2. Cut
out of the Taylored Expressions red an oval and the Merry Christmas out of the
birch. Cut the Poinsettas out of the Red
as well.
3. Next
fold along the tabs and bottom of the pieces on the bags, then run along the
tabs tape, make sure the tabs are on the inside of the bag so they don’t
show. You want the flat of one bag to
attach with the tab of the other, to match up.
DON’T do tab with tab when taping.
Always make sure there is a flat side with the tab.
4. Assemble
– put the bag together and then attach just with glue the oval and Merry
Christmas words over that oval. Then
attach the poinsettas onto the bag and also the scalloped edge on top. Then go ahead and fold the base in and tape
together. Take the handles and attach
with glue and put the circles if you want on top in front of the handles.

Blessed Card
Supplies:
8
½ x 11 Paper Cut metallic Brown paper for base
Cougar
Natural White
Bazzill
Lava
Gold
ribbon
Versafine
Ink
Gold
Embossing Powder
Pop
up tape
Gina
K Autumn Wreath Builder Stamp set
Gina
K Wreath Stencil set
Versafine
Clair Stamp Ink
Green
Oasis
Golden
Meadow
Shady
Lane
Acorn
Tulip
Red
Directions:
1. Cut
base out of Paper Cut Brown 4 ¼” x 5 ½”, cut Cougar natural white 4 ¾” x 4 ¾” ,
and Bazzill lava 4” x 4”.
2. Use
Gina K Stencil (smaller) put your courgar natural white in and place start
stamping the maple leaf in Acorn and move the paper around in each
corner/slot. Then go with the next leaf
and continue on with remaining stamps.
3. Stamp
out Blessed on little piece of Cougar Natural White with Acorn and then take
Versamark and stamp the edges and put gold embossing powder on and heat the
edges.
4. Assemble
– put the lava close to the top of the brown and then put the stamped cougar
natural white on top of the lava with border.
Then put ribbon across the brown below the lava. Put the brown onto Natural White base for
card.

Happy Birthday
Paper: Authentique,
Royal Fiber and Bazzill
Die: Our Daily Bread
Designs, Spellbinders and Sizzix
Kaiser Gems
Cut the Happy Birthday from Brown paper
Cut the Labels from Authentique paper
Cut the Flowers from Blue and the branch from Authentique
Card base is 5.5 b9 (scored at 4.5)
Cut the pattern paper 4 x 5.5
Using the die from Our Daily Bread cut the front of the card
and mount the pattern paper to it.
Add the labels, birthday greeting and flowers
No comments:
Post a Comment