
Happy Birthday Foil Stenciling
Supplies:
White
cardstock
Pink Mirricard cardstock
Deco foil- purple & rainbow shattered
class Deco foil transfer gel
Palette knife
Gina K stencil- Sun spots
Gina K
foil-mates- Birthday
Laminator
Circle die
Foam tape
Dimensions:
White
cardstock- 6X12 (6X6 folded) & 51/2X51/2 Pink Mirricard- 53/4X53/4
Directions:
1.
Using a palette knife, apply
transfer gel over the stencil onto the white cardstock piece
measuring
51/2X51/2. Allow to dry for at least 1 hour.
2.
Place shattered class foil
over the stenciled image. Put through a laminator. Gently peel
back foil.
3.
Using a circle die cut out
the greeting. Place a piece of purple foil over the circle greeting.
*Hint..add
a piece of cardstock under the piece you are foiling. This will help the foil
adhere
to the image better. Run through the laminator.
4.
Mount the pink Mirricard
piece onto the front of the card base. Then mount the stenciled
piece in the
center of the pink mat.
5.
Using foam tape, mount the
circle greeting in the center of the foiled image.

Shiplap Floral Card
Supplies:
Magenta cardstock White
cardstock
Desert storm cardstock
Versamark Clair Nocturne ink pad
Memento inks:
Cantaloupe, Dandelion, Pear Tart, Bamboo Leaves, Lilac Posies & Teal Zeal
Hero Arts Unicorn ink
Taylored Expressions Handlettered sentiments stamp &
dies, Fresh Picked Florals & dies &
Circle dies
Dimensions:
Shiplap background
Magenta cardstock- 51/2X81/2 (folded
51/2X41/4)
Desert storm cardstock- 4X51/4
White cardstock- circle frame, scraps
for stamping greeting & florals
Directions:
1. Stamp all the florals and die cut them out.
2. Stamp greeting using black ink and die cut
out.
3. Stamp the shiplap background using white ink
onto the Desert storm cardstock piece.
4. Cut out the circle frame
5. Mount the shiplap background piece onto the
magenta card base. Center the circle die in
the upper right hand corner about 1/4” from the
top and side edge and cut out the circle
window.
6. Mount the circle frame on the inside of the
card base, creating a white mat for the circle
window.
7. Using foam tape, mount greeting on the inside
of the card base so it shows through the
window.
8. Arrange & mount the floral cut outs using
a mix of foam and regular adhesive to add
dimension.

Chevron Baby Card
Supplies:
Brown
Cardstock
Cream Cardstock
Light Blue Cardstock
Desert Storm Cardstock
Chevron
Background die & Baby Blessings die by Divinity Designs Memento Rich Cocoa
ink pad
Blending tools
Dimensions:
Cream
Cardstock- 41/2X11 (folded 41/2X51/2)
Die cuts- Chevron background cut out
using Desert Storm, Light Blue & Cream cardstock
Teddy Bear
& Onezie using Desert Storm Cardstock & The bib using cream Cardstock
Directions:
1. Die cut
& emboss all pieces.
2. Mount
the Chevron Background to the cream card base. *Hint add liquid adhesive around
the outer edge of the frame only. Then add liquid adhesive to the thin chevron
stripes as you build your chevron pattern.
3. Fill in
the chevron background by mounting alternating colors- cream, light blue &
desert storm.
4. Add
brown ink around the edges of the bib & onezie.
5. Die cut
the bear and leave it in the die, emboss & (using the die as a stencil) add
brown
accents to
the bear using a dauber or blending tool. Add the bear onto the center of the bib.
Using foam tape, mount the bib onto the onezie.
6. Add the
greeting “Welcome Baby” onto the onezie. Then add the brown snaps to the bottom
of the onezie.
7. Mount
the onezie over the chevron patterned background, at an angle, near the center.
8. Tie the ribbon in a bow and add to the collar of the onezie using a glue dot,

Tim Holtz Poinsettia
Pieces Card 1 (Gold)
Paper colors
Gold 4.25 x 5.5 to cut the color
Red 4 x 4.5
Green 1.5 x 5.5
Green for top 4 x 5.25
Card base can be either gold or white 5.5 by 8.5 scored at
4.25
Gold ribbon
Place the poinsettia die in the upper left corner of the
gold paper leaving a quarter inch border on the top and left. Then place the leaves and run through a die
cut machine.
Place the red under the poinsettia and green under the
leaves and cut by hand leaving and 1/8th to ¼ inch border
Glue the flower and leaves to the Green used for the top.
Add the ribbon and assemble the card.

Tim Holtz Poinsettia
Pieces Card 2 (blue/green card)
White paper:
Top is 4.25
x 5.5
Card base
5.5. x 8.5 scored at 4.25
Inks:
Distress
Ink: Pistachio, Mowed Lawn and Tumbled
Glass
Versafine
black for sentiment
Stamps: Penny Black
sentiment Beautiful Heart
White ink for splatter
Cut the poinsettia and leaves from the white for the top
placing in the lower right corner and leave a border
Using the Distress inks color the card base (right side of
fold) using a random application. Color most of the 4.25 x 5.5 card. The mowed lawn should be used sparingly. Splatter white over the Distress inked
paper..
Stamp the sentiment in the upper left corner and assemble
the card.
Gina K Stencil: Square Mandala
Paper:
White 4 x
5.25 for top
Gold 5.5 x
8.5 for card base
Distress Ink: Spiced
marmalade, Scattered Straw, Peeled Paint and Gathered Twigs
Gina K Glitz Glitter Gel: white
Stamp for sentiment:
Taylored
Expressions: Hand lettered Sentiments
Ribbon: Green 18
inches
Pixie Spray
Pallet knife
Spray the stencil with the Pixie Spray and align when rub
down on the white paper.
With the pallet knife apply the Glitter Gel. Remove the stencil and clean. Allow
the stenciled image to dry approximately one hour.
When the Glitter Gel is dry using Distress ink applicators (
we used the TE Brushes) randomly color the stenciled image.
Stamp the sentiment on a piece of paper with Gathered Twigs
and cut die cut. Apply with to an oval
cut from the gold. Punch a hole on each
side of the oval to run the ribbon through and then tie a bow. Assemble the card.

Penny Black Sweet Sails
Stamps
Penny Black
Sweet Sails
Penny Black
Beautiful heart
Inks:
Archival :
Ground Espresso, Peeled Paint, Faded Jeans
Distress
Ink: Salty Ocean and Antique Linen
Versafine
Black
Versamark
embossing pad
Clear embossing powder
Tombow pen-red
Paper: White 5.5 x
8.5 folded for base 4.25 x 5.5 to stamp
This stamp is best done using a stamp positioning tool.
1.
Place the
stamp in the stamp positioner. Align the
paper with the stamp.
2.
Using the archival inks you will ink directly on
the stamp. The brown for the tree trunk,
blue for the water, green for the tree and grass and the tombow marker for the
boats. Then stamp onto the paper. You may need to do the tree more than once.
3.
Do Not move your paper. Clean your stamp off and ink it with the
Versamark, stamp over your inked image and clear emboss.
4.
Using the Distress Inks mask of the water in
order to make it darker. With the same
ink go into the sky with a soft touch using the Salty Ocean. Do the same over the grass area with the
Antique Linen.
5.
Stamp the sentiment in the upper left corner.

Flocked Santa
Stamp: Rubbernecker “Santa
with Present” and die
Taylored Expressions sentiment
Echo Park “flurries’ stencil
Deco foil Transfer gel
Deco Foil White flocking
Copic markers: R20, R
24, R27, W7, E00, E50, C1, G43
Gold pen
Ink: Memento Black
Paper: White 4 x 5.25
and 5.5 x 8.5 folded
Green paper cut 4.25 by 11 and folded at 5.5
Pixie Spray
Heat laminator
1.
Using the
Echo Park stencil (sprayed with the Pixie spray to hold it on the paper) place
on the 4 x 5.25 paper. Using the
transfer gel apply it over the stencil.
Allow to dry an hour (can do upto 10 hours ahead)
2.
Stamp the Santa, cut out and color with the
copics
3.
When gel is dry using the white flock face down
on the gel image (the two are kissing) run through the laminator twice
4.
Assemble the flocked paper onto the green . Stmpthe sentiment on a strip of paper and
mount with foam tape the Santa to the card.
Directions will be posted later for these two cards

Windmill Card
Supplies:
Penny Black Stitched Nested Frames Die set
Penny Black Country Life (Windmill)
Taylored Expressions Simple Strips Background
Taylored Expressions Simple Strips Die
Versafine Onyx Black Ink
Ranger Clear Embossing Powder
Distress Oxide Inks:
Tumbled
Glass
Peeled Paint
Bundled Sage
Walnut Stain
Scrapbook Adhesives Thin 3D Foam Squares
Cardstock:
Fossil/Desert Storm (card 4¼ x 5½ʺ)
Cougar White
Black
Directions:
1.
Die cut 2 pieces of white cardstock using PB Stitched Nested Frames dies 4 and
6 (#1 is smallest die)
2.
Place windmill stamp in Misti.
3.
Stamp windmill on largest rectangle using Versafine Onyx Black ink. Leave
rectangle in Misti
4.
Place smaller white rectangle over stamped one in Misti aligned so windmill
will stamp on it. Use Repositionable Adhesive to hold it in place over larger
rectangle. Stamp windmill with Onyx black
ink. Heat emboss windmill with clear
embossing powder.
5.
Use applicator sponge to apply Walnut Stain Oxide ink about 1 inch from edges
of large rectangle. Mist with water
6.
Use applicator with sponge to apply Tumbled Glass Oxide ink to sky of windmill
image. Apply little Walnut Stain to base
of windmill along with Peeled Paint and Bundled Sage. Use paper towel to rub ink off windmill.
7.
Fasten larger background windmill piece to black card stock mat. Fasten to card front
8.
Fasten windmill piece to black card stock mat. Fasten to card with Thin 3D Foam
Squares.
9. Cut piece of fossil cardstock to about 1 x 4
inches.
11.
Ink Simple Strips Background “happy
birthday to you” only with Onyx black ink.
Stamp on fossil card stock. Clear
heat emboss with clear embossing powder.
12. Cut strip with Simple Strips die.
13.
Trim ends off strip. Mat on black card
stock. Fasten to card with Thin 3D Foam
Squares
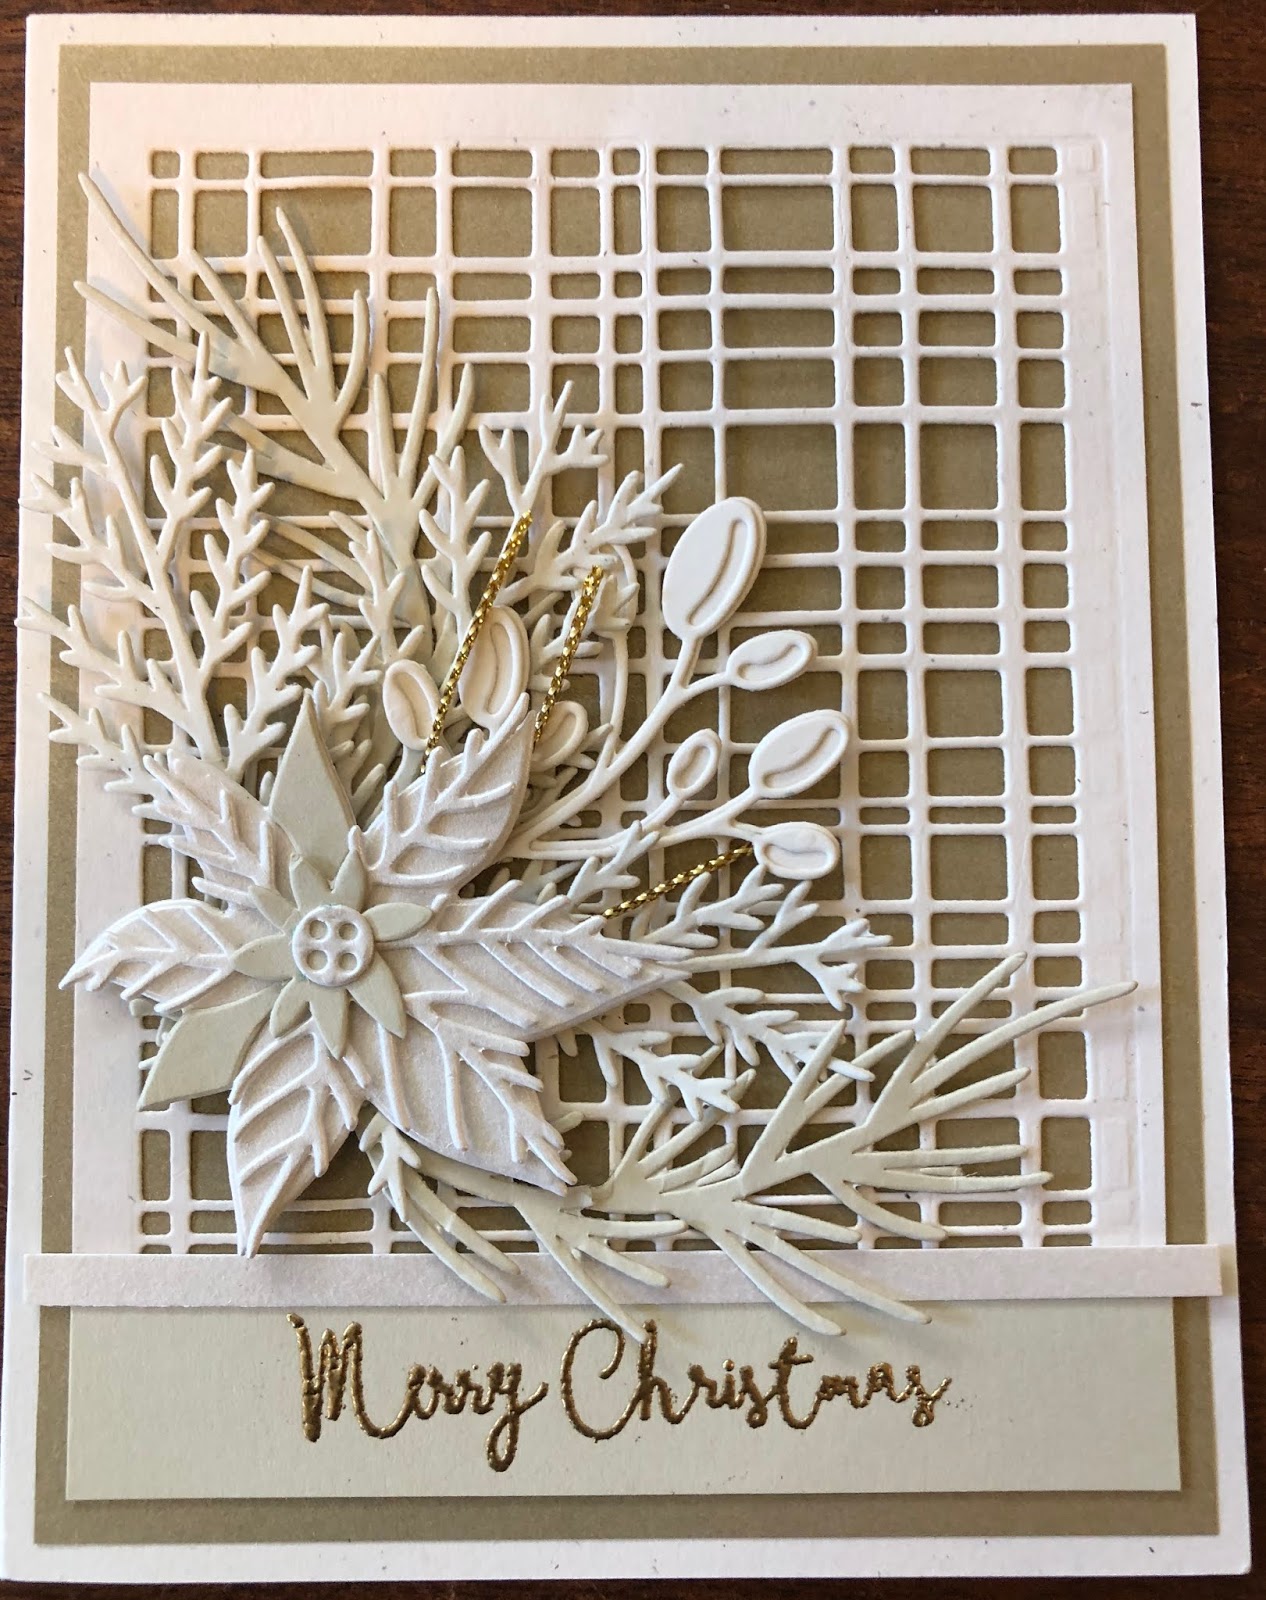
Poinsettia with Foliage Card
Supplies:
Tim Holtz Large Funky Festive
Tim Holtz Festive Repeat
Versamark Ink
Ranger Gold Embossing Powder
Scrapbook Adhesives Thin 3D Foam Squares
Cardstock:
Royal Fiber
Birch (card 4¼ x 5½ʺ)
Royal Fiber
Cottonwood
Saw Grass
Pearlescent
Ivory
Pearlescent
Gold
Gold Cord
Directions:
1.
Fasten Pearlescent Gold paper (4 x 5⅛ʺ) to Birch card
2.
Use Festive Repeat die 2 times to die cut background in Birch paper (3¾ x 4¾ʺ).
Fasten over gold paper on card
3.
Stamp verse on Saw Grass paper (¾ x 3¾ʺ) using Versamark ink. Heat emboss with gold. Fasten to card.
4.
Fasten Pearlescent Ivory strip (¼ x 4ʺ) across top of verse
5.
Die cut 2 pine branches from Saw Grass; 3 twig branches from Cottonwood; 1
berry branch from Birch papers. Die cut
poinsettia, veins and center dot from pearlescent ivory; leaves and center from
Saw Grass
6. To assemble poinsettia: glue leaves over
large poinsettia; fasten vein piece on poinsettia, then add irregular shape
center and finally dot center.
7.
Arrange and fasten pine branches, then twigs and berry branch to card.
8.
Cut 3 pieces of gold cord. Fasten over
foliage where poinsettia will cover ends.
9. Fasten poinsettia over foliage using Thin 3D
Foam Square.
No comments:
Post a Comment