Friday, October 31, 2008

Happy Halloween!

Halloween greetings to all our blogger community!

I must admit I only made one Halloween card this year. I found 2 that I made last year so I had three to send to my grandchildren. They rate on the top of my list!

Tonight I'm sharing a card that I got in the mail today! I love handmade cards that come in the mail! What a treat!

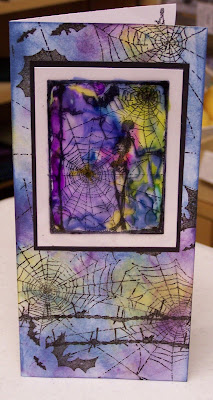
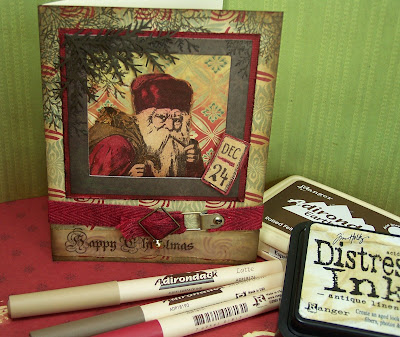
Kathy made this card for me. What a nice break from traditional orange & black!

I recognize the stamps that she used along the fold from a Tim Holtz Halloween set. I'm guessing the little verse is from A Muse. All the embossed creatures must be from a Cuttlebug embossing folder. The paper? You guessed it.....Core'dinations that's been sanded. That little spider on bottom is sure cute! and the cat! and the bat with the big eyes!

No tricks tonight........just a very nice Halloween card treat.

Thursday, October 30, 2008

Moonlight Madness!

Tonight was Moonlight Madness in Walnut Grove! It's a fun night when the stores offer discounts. Many customers come in their Halloween costumes. Everyone is in a festive mood!

I stopped at the store after work to see Kathy, Mary & Doreen in their "costumes". I ended up helping for about an hour. The store was packed. Kathy & Mary were permanently fixed behind the checkout counter bagging purchases & ringing up sales! Doreen & Sally were refilling the food sample dishes & helping customers. I stood near the door to offer each customer a chance to draw a little orange discount coupon from a black cauldron. Each coupon gave a percent off of their entire purchase. Lots of fun shopping!
Lucky for me I had my camera along! (I often do just in case I need to get a picture of a card for the blog.) Well, tonight I got some pics of 3 of the Fond Memories Girls........in costume. Don't you wish you could have been there?
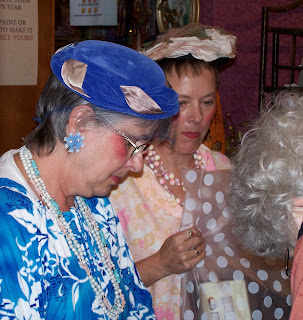
Here's Kathy & Mary in action behind the counter........... Love those red cheeks!
Okay, now I got their attention....... Aren't they pretty?

And here's Doreen.........isn't she sweet in purple?

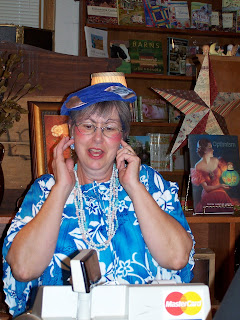
I tried to get another photo of Kathy just before I left. Kathy's comment was "not now I'm trying to think" as she rang up another customer's purchases......... I think she was pondering whether she hit the right key on the cash register at this moment. Or maybe she was just checking her earrings?!!!
It was a fun time in the old town tonight!

Tuesday, October 28, 2008

Trees for Sale

Brrrrrr.....didn't this morning's temps feel like winter? I had to remind myself that it is still October. I sure hope we get some warmer days.
Today, I did some stamping on my lunch. Usually, I spend my time chatting with whoever is working........or shopping for more stamping stuff. I did my shopping on Monday so I had a new stamp set to work with today.
The set is Winter Vintage Signage by Cornish Heritage Farms. I used one of the stamps for the little sign. Isn't it cute? There are 8 different signs as well as a vintage frame to put around the verses. I chose to frame my little sign with a dark green mat & tiny brads in the corners. I stamped it with Adirondack Cranberry & Distress Pine Needles selectively applied to the stamp. There's a touch of red Spica marker on the star & arrow. (Spica markers have fine glass glitter in them.)
The tree stamped all over the background is new from B Line. It just came in last week. I think it's just the cutest little tree! I stamped it many times with Distress Pine Needles ink on white paper. I used more Pine Needles to shade the lower portion, Peeled Paint towards the tops of the trees & Broken China at the very top.
This was a fairly quick card. I wanted to try an idea for an even quicker card but I ran out of time tonight. If only I didn't need to sleep! Maybe I'll get that put together on my lunch tomorrow.
Let's think warm......and keep stamping!

Monday, October 27, 2008

Christmas in Blue

A Christmas card in blue!

How beautiful is this Thomas Kinkade Village Christmas? It's simply stamped in Versafine Majestic Blue ink. I added touches of Crystal glitter to all the snow areas. Isn't the detail incredible?

The card front is covered with a piece of dark blue vellum which has silver stars on it (I don't know the company but it's at Fond Memories.) I stamped over it with Penny Black Snowy Scroll using White Cotton StazOn. I used the blue vellum again as a mat on the stamped image only it's the back side. Perfect color match without the stars. That's layered onto a white mat. A white ribbon & 3 brads (with glitter added) finish off the card.

I hoped you could see the glitter in the close up. If you look closely maybe you can see the sparkle on the rooftops.

Happy stamping!

Sunday, October 26, 2008

Red Foil Birds

Good Morning all!

Today, I have a quick card........at least it's much quicker than the cards I've posted lately.
This red foil with birds & branches was quickly made by embossing a piece of red foil in a CuttleBug embossing folder. To remove the red on the birds, I used a Tiny Touch applicator with a bit of Ranger Solvent Stamp Cleaner. The solvent removes the color. Be careful to use just a tiny bit & keep it on the birds.....it removes color wherever it touches the metal. I think alcohol will work the same way......try it!
When I buffed the metal with a paper towel to remove any solvent, a tiny bit of color rubbed off the branches & leaves.......just enough to accent them. A nice surprise & it adds to the image! Of course, you could sand the color off but sanding will leave tiny scratches on the metal. I didn't want that look for this card.
The black frame was cut using 2 Spellbinders dies: one rectangle & a bigger scalloped rectangle. I put both dies on a magnetic mat (Spellbinders) & cut both edges at the same time. Then I embossed it by using an embossing mat & running it through my Spellbinders Wizard again. If you look closely, you'll see the embossed ridges just inside the cut edges of the rectangle & scallops. Papers are from Wild Asparagus by My Mind's Eye. I added a textured dark red ribbon, a verse from Cornish Heritage Farms Script Essential Expressions........and it's done!
Send it to someone special.......to brighten their day!

Thursday, October 23, 2008

Gifts at the Door....

I did some more stamping with Artistic Outpost's Snowy Woods stamp set......a wonderful mix of stamps. One of them is a door with a wreath & greenery. My first thought was that I really didn't know what to do with the door. So I challenged myself to try working with it.

I stamped it with Versafine Black Onyx & used Adirondack markers (Pesto, Meadow, Lettuce, Slate) to color the wreath, greenery & accent the shadows on the door. Then I added Weathered Wood Distress ink to the wood of the door & siding. I used Anitque Linen over the complete image to "antique" it. I added "berries" with a dark red gel pen. I stamped the wreath....another stamp in this set......& colored it to match the greenery. I used foam tape to attach it to the door. The bow is a silk ribbon. Silk ribbon is so soft & drapes nicely which works so well for this small bow.

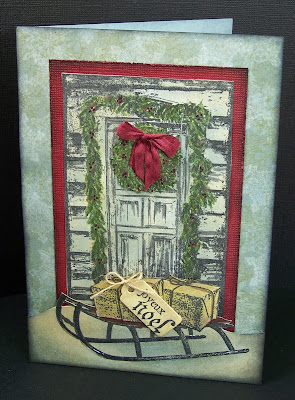
The sled took a bit more work. I stamped one package, then I masked it. I stamped the second package. I added a mask to that package & then stamped the sled. I used a stamp positioner so I could get the sled to be under the packages. (An easier way would be to stamp & cut out the packages, stamp the sled, then glue the packages to the sled. Too bad I didn't think of that before now! )
I colored the packages with Distress inks using Cut n Dry foam. I think I used Antique Linen & Vintage photo........I forgot to make notes. I added Glossy Accents to the sled runners......it doesn't show up very well in the photo. I cut out the sled & packages creating a "snowbank" with the cut edge. I used Weathered Wood to shade along the sled runners & outer edges; the rest is colored with Antique Linen. The little tag is cut with a Spellbinders die. I stamped the verse & then re cut the tag to shorten it. It's distressed with Antique Linen. Do you think that's probably my most used Distress ink.......Antique Linen? You're right! I added a twine bow & attached the tag with foam tape. The sled & packages have 2 layers of foam tape near the center & none at the edges of the card.

I had all these pieces on my work table for a couple days before I put them together because I couldn't find quite the right paper for the card. I finally created a background paper. I started with white paper, stamped snowflakes......also in this set......with Brilliance Moonlight White & heat set the ink. Then I stamped the pine branch using Adirondack Oregano ink. I rubbed Weathered Wood distress ink all over the paper & images. The pattern is subtle but I really like how it turned out. Because Weathered Wood is the same color as used on the door, the colors blend perfectly. Once I put the card together, I added a touch of Black Soot Distress ink along all the edges.

For the inside of the card, I used the pine branch with Oregano ink again. I stamped the ink off twice so the image is very soft. I used Adirondack Raisin for the verse. I love the script in this verse. Isn't it elegant? You guessed it, it's part of this set, too!

Happy stamping!

Wednesday, October 22, 2008

A New Color Twist on Halloween

How's this for a new color combination for Halloween?

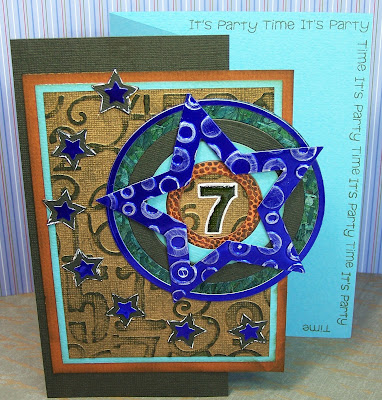
Forget about orange & black.......try these colors!

The color on the card was accomplished using various Distress inks: Faded Jeans, Scattered Straw, Dusty Concord. The color on the focal image is Adirondack alcohol inks on the back of acetate: Denim, Butterscotch, Eggplant, Wild Plum & Lettuce. The Tim Holtz ATC Halloween image was stamped on the acetate with StazOn. Then alcohol ink was applied to the back of the acetate. Kathy learned this technique at CHA: put drops of alcohol inks on a palette & let dry, fill a waterbrush with Blending Solution, use the brush to paint with the dried inks. That's how she applied the color to the acetate. It's a bit more controlled than using an applicator. The color palettes of the two inks are very compatible so the colors seem to be the same. Stamps used on the card are from the Trick or Treat set by Tim Holtz from Stampers Anonymous. Card design by Kathy.

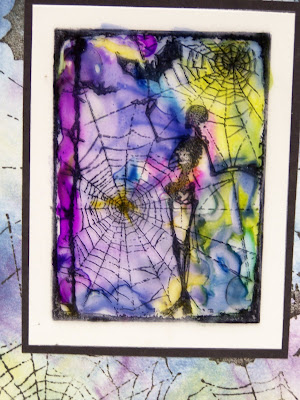
Here you can see the wonderful range of color on the acetate. By layering the acetate over white paper, the colors intensify.

I really like the colors on this card! It's a fun change from traditional Halloween colors. Use this card for inspiration if you're not into Halloween (like me). Try this combination for a Christmas card. I think it would be great with snowflakes.

Challenge yourself......step out of that box! You never know what wonders you'll create.

Monday, October 20, 2008

New Core'dinations Papers

One of our wonderful customers left a comment about the anniversary card that was made with Core'dinations paper. That reminded me to tell everyone that some of the black Core'dinations papers are in at the store now. Yeah!!

I picked up a few last week. Most of the colors are what I would call "winter" colors......darker shades. There are some colors that will work great for Christmas cards. There is also one dark brown with red. Wonder how that would work with a vintage Santa image......an idea to try!

Remember Moonlight Madness is next week! Have you got your costume picked out? Ready to come shopping for some great deals & a wonderful selection of gifts? New things have been coming in every day. Today, Kathy suggested that they would need to move all the antiques out to make room for all the new things she & Doreen picked out at market! Guess that means lots of new stuff! (I don't really think she was serious about moving the antiques out!)

Some background stamps from Cornish Heritage Farms came in today. These are the ones I remember: burlap, notebook, a small flower pattern & aged wood. Those aren't the names of them.....just my description. Be sure to check them out when you're in the store!

I discovered tonight that the Fond Memories blog & the Santa card made the "Shout Out List" on the Card of the Week website. I'm thrilled. I check that website often. I've often wondered how the Card of the Week is chosen. I still don't know the answer to that question but I'm pretty honored to make the Shout Out List. I'll keep working for Card of the Week!

The Santa card was also featured on the Artistic Outpost blog on Saturday. You can check it out here... http://www.artisticoutpost.blogspot.com/ Just scroll down a bit to see it. How special ist that! It sure is to me!

Until next time........smiles to everyone.


Sunday, October 19, 2008

The Forest Chapel

.........a Thomas Kinkade stamp from Cornish Heritage Farms.
Some of the Thomas Kinkade stamps arrived at Fond Memories last week. These stamps have incredible detail just like Kinkade's paintings. Sometimes when I see a stamp that has a colored index on it like these, I'm reluctant to stamp with it because I think it will be hard to replicate the colors. You might think that about a Thomas Kinkade stamp. After all, he is known for his absolutely beautiful use of color.

.........so here are a couple cards that I made without coloring the image in detail.

First, I stamped the image using Versafine Black Onyx. Versafine is one of the best inks for fine detail stamping. Next, I cut out the chapel using an oval Spellbinders die. (You could also use the Coluzzle cutting system with an oval template.) I matted it on bigger ovals cut from black & white paper. I edged the white mat with a black marker. Then the image was mounted on a gray Bazzill card over a white satin ribbon. The verse is from Cornish Heritage Farms Script Essential Expressions set. I think the image is just stunning without adding any color!

Now, here's a second card that has a touch of color added..........


I again used Versafine ink but this time it's Olympia Green. I cut out the chapel & a dark green mat with round Spellbinder dies. Using a piece of Cut N Dry foam, I added a touch of green with Distress Peeled Paint ink. (Tip: Ink the foam lightly, rub it on scratch paper, then apply the color to the image so that it's very light. I often "huff" on the foam to add a bit of moisture to release more of the ink.) The card is Bazzill. I sponged on Peeled Paint ink to the lower edge for the darker color below the twill. The twill tape is green but I thought it needed to be a bit darker so I slid my black StazOn pad over it; it added a touch of dark to the ridges in the twill. I used the same verse from Cornish Heritage Farms Script Essential Expressions.
Now, for a colored version of the Forest Chapel.........

If you read the blog yesterday, I mentionned that I would post an image colored exclusively with Distress inks & Tiny Touch applicators. That is exactly how I colored this stamped image of the Forest Chapel by Thomas Kinkade - Cornish Heritage Farms. I was amazed myself with how well it turned out!
I stamped it with Versafine Black Onyx. Then I started coloring with these Distress inks:

Weathered Wood

Broken China

Scattered Straw

Peeled Paint

Shabby Shutters

Tea Dye

Dried Marigold

Worn Lipstick

Brushed Corduroy

Milled Lavendar

Tattered Rose

Aged Mahogany

Once I had it all colored, I cut the oval using a Spellbinders die. I cut the next size larger oval from Bazzill "Berlin" for the mat. Because it's matted, I mounted it with foam tape over the hole in the original image (the mat being bigger than the hole so it hides it). I used the Bazzill Berlin to mat the complete image & added a tiny white mat; then matted it on another green Bazzill paper (I don't know the name..) which I distressed with Antique Linen & Walnut Stain to add shading to the edges. I had intended to make this into a card & add a verse.......I couldn't cover any of the image once it was done. For now, I will set it on a shelf in my stamping room to admire.

Saturday, October 18, 2008

Ho, Ho, Ho!

Merry Christmas!


Well, not quite yet but today I have a Santa card to share. I had fun creating this card using the Artistic Outpost Snowy Woods stamp set.

Artistic Outpost Snowy Woods stamp set
Cosmos Cricket paper
Creative Impressions hardware
Ranger Espresso & Distress Antique Linen inks
Ranger Adirondack markers: Cranberry, Latte, Mushroom
McGill Pine Branch punch

I used Ranger Espresso for all the stamped images. The santa is colored with Adirondack markers: Cranberry, Latte, & Mushroom. These markers are alcohol based so they do not smudge the image since it was stamped with a water based ink. In order to get the skin color, I scribbled a bit of cranberry marker on a my glass work surface. I added a bit of acohol to dilute the color & then picked up the color with a Tiny Touch applicator (from Ranger & Suze Weinberg) to color the hands & face. (These little applicators are great for detail work. Tomorrow, I'll post a Thomas Kinkade image that's totally colored with Distress inks using Tiny Touch applicators. Did I get your interest peaked? Check tomorrow....)
After the Santa was colored, I rubbed Distress Antique Linen over him to give that vintage look. He is mounted with foam tape under his head & shoulders to give dimension; no foam tape under the bottom edge so that it will fit under the frame. The frame was cut using 2 Spellbinders square dies. The delicate pine branches were cut with a punch from McGill that's new to Fond Memories. I love the detail. I must warn you that this punch is extremely hard to cut through cardstock. I literally had to step on it to push is through the paper. It was worth it, don't you think? The hardware & red twill are from Creative Impressions. I stamped the verse on vellum & embossed it with clear. The wonderful papers are all from Cosmos Cricket except the red mat which is Bazzill.
Enjoy!

Wednesday, October 15, 2008

Take 6 cards

Here's what you missed if you didn't get to the store for the Take 6!


The Far Out Holiday card is a Hero Arts design. This little robot is so cute! I used the little tree from the same set on some of the tags shown last week.


This Welcome Baby card uses a Cuttlebug embossed background & a sentiment die. The yellow paper is Core'dinations which has a white core brought out by sanding the embossed image. Card designed by Doreen.


Live Simply is the 3rd card. Doreen designed this card using a small clear Hero Arts set called My Art. Aren't the colors great?


Simplify is the 4th card. All stamps are from the Primitive Beginnings set from Cornish Heritage Farms. Another great design by Doreen.


The 5th card is bright & colorful & uses an Ellzybells stamp. The papers are so fun & fit so well for a birthday card. Great job Doreen!
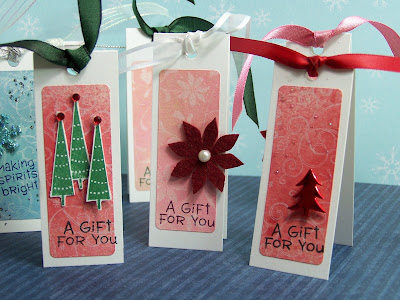
The last of the Take 6 is 3 holiday tags. The background is created with a Penny Black swirl background stamp as well as a Penny Black snowflake from the Crystalline clear set. There were a couple little verses to use from Hero Arts sets. The snowflake brads are from Creative Impressions.
Be inspired to create..........make a card to brighten someone's day!


Tuesday, October 14, 2008

Believe Card by Doreen

Good morning all! Brrrr..........the temps this a.m. remind me that Fall is truly here and winter is soon to come.......


Doreen created this card that has a " snow" theme. She used a Cuttlebug embossing folder for the wonderful background. The paper is Core'dinations so when she sanded the surface the lighter blue core color really sets off the pattern. The large snowflack is cut with a Cuttlebug die. She layered a smal blue felt snowflake over it - from Creative Impressions. She also added a few holographic snowflakes with small brads. The verse is from the Joyeux Noel set by Cornish Heritage Farms which includes 4 snowflakes & 3 other words/verses. I really like the contrast of the deep blue background with the bright white snowflake!

.......keep warm!

Sunday, October 12, 2008

Simple Life


Here's a card created with another Cornish Heritage Farms stamp set called Primitive Beginnings. It's been on display at the store but I thought our blogger friends might enjoy seeing it. Anyone who attended the workshop had an opportunity to use this stamp set on the Sheep card.

On this card, I stamped the house on cream & red paper. I then cut out the cream house & just the roof & door from the red one which I glued to the house. I used the same technique for the green hills. I stamped them 3 times. Then cut out one complete set of hills & the 2 front hills. I layered them onto the blue oval cut with Spellbinders die using foam tape to give dimension. I trimmed the green hills to match the oval edge after they were in place. I glued the house in place & stamped the verse.

I cut a bigger oval of black paper for a mat using a bigger Spellbinders oval - a great feature of the Spellbinders Nestabilities shapes. The image is mounted on a dotted background of My Mind's Eye Merry Christmas Dots paper. I added faux stitching around the edges with a black marker. A ribbon & some buttons complete the design.

Thursday, October 9, 2008

all things fall

I was reminded today that I hadn't posted anything to the blog in a few days....

What have I been doing? I've been reading other blogs. So I apologize for not putting something new here for you all to read. I know how disappointed I am if one of my favorite blogs has nothing new to enjoy.

Thanks to my friends for keeping me on task..........smiles to you. You know who you are! You challenge me to create! I listened & took heed of a suggestion for a Fall card.........


I stamped the scrarecrow from Cornish Heritage Farms "All Things Fall" on tan, almost kraft color, paper with Ranger Espresso ink. I added a touch of color with a Q-tip to his hat & the straw with Distress inks: Scattered Straw & Fired Brick. I used Bazzill papers for the mats. The patterned paper is Graphic 45. The colors just seemed to "fit".

I stamped the verse "all things fall" on the checked paper & then laid the Spellbinders leaf die over it so that I could see the verse. I crossed my fingers that the die wouldn't slip when I put it through my Wizard. It worked! I used a dark brown marker to outline the edges of the leaf. It's mounted with foam squares.
I knotted the ribbon & wrapped it to the back of the mat. It's much easier to do that than try to wrap the ribbon around the mat & then tie a knot.

This really is an easy card to stamp just a lot of paper cutting for all the mats plus the leaf. Enjoy!

Take 6 is going on at the store on Saturday. Every time slot is filled. I plan to post photos of the cards for everyone who can't be there.

I'm looking forward to a long weekend.......Monday is a holiday for me. I've promised myself time to stamp & relax.

Until next time....

Monday, October 6, 2008

Anniversary Card

My husband & I recently celebrated an anniversary. Here's the card we received from my sister Kathy........
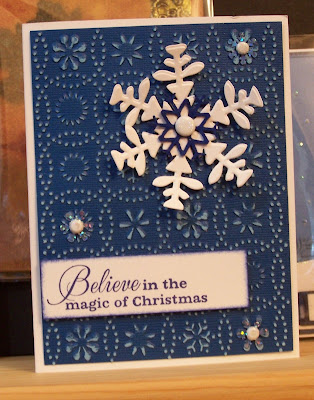
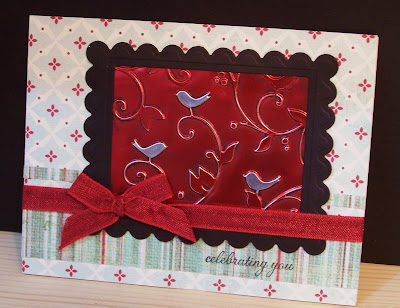
The background piece was embosed with a Cuttlebug embossing folder. She told me that she sanded the design but didn't like the pastel color so she oversprayed the design with Tattered Angels Glimmer Mist Deep Plum. The floral pattern on one heart is created with a stamp by Tim Holtz from the Nature's Discovery set and silver embossing powder. She didn't know the maker of the "Love" stamp but it's also embossed with silver. She did a bit of recycling with the tissue paper........saved from a gift she received. The black paper is from Core'dinations which has a core of a different color, in this case the inside & core are lavendar. This paper works so great with the Cuttlebug embossing folders because the second color shows once the design is sanded. FM has many colors of the Core'dinations papers. Unfortunately, the black papers are not in stock right now........they're on backorder.

Spread some love........
..............stamp & send more cards!

Sunday, October 5, 2008

Twin Cards


A birthday celebration!


Today, my grandsons turned 7. We spent the day celebrating & enjoying family time, good food, and best of all, birthday cake! 
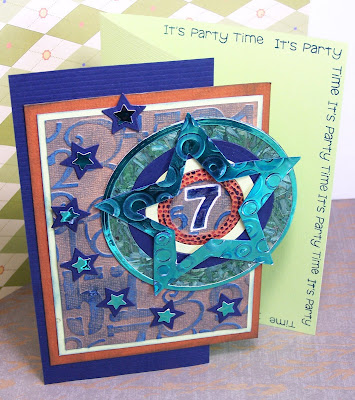
The boys are twins so I made their cards alike only different colors......one blues & one greens. I used the Spellbinders dies to cut all the circles & the star. It's so easy to create a frame.......like the star......with the Nestabilities dies. The very tiny stars were cut with a punch. I used Cuttlebug embossing folders for the numbers background & texture on the star frames.

The "It's a party" stamp is from a Technique Tuesday set called Small Talk. I used several different papers for the circles. The star frames & tiny stars were cut from metallic paper. I used the Ranger Inkessentials white pen to outline the "7".

These were not quick cards!


But fun!

Thursday, October 2, 2008

Putting off bedtime....

Last night, just before heading to bed, I decided to try a Cornish Heritage Farms stamp called "We Three Kings". I have this need to stamp or create something everyday and I hadn't yet done any stamping. Can you tell I was putting off going to bed? I wanted to play......

I used Adirondack Denim for the Kings on white paper. It stamped so beautifully & clearly on the first try. I added the "Modern Star" with Brilliance Moonlight White which I heat set to dry the ink completely.

This is my favorite part......I got out my Distress inks & Cut N Dry foam bits to color the background. First, I added Scattered Straw around the Star. The ink soaked into the paper a little too quickly & blotchy so I added Antique Linen in a bigger area around the star hoping to smooth out the color & add a base of ink. (A note of warning: the Denim ink did bleed with the Distress inks because it's also water based. StazOn Midnight Blue would be a better choice to avoid bleeding. )Next, I used Broken China, Faded Jeans & Black Soot working towards the edge with progressively darker colors. The Brilliance ink resisted the Distress ink leaving a subtle image of the star. I thought it needed a touch of something to "pop" it but I didn't want to add glitter. I tried my Ranger white Inkessentials pen with a dot at the star top. It was too white! .....so I smudged it with my finger. Voila! I liked the look. I continued to add touches of white & touch & drag the color (with my favorite tools......fingers) to diminish the brightness. The Distress inks were still wet under the white pen so the ink moved easily.
I used a Spellbinders ribbon slide die for the verse (Cornish Heritage Farms) which just fit. Again, I used Distress inks to add color & shade the edges. The Wisemen are matted on pearlescent gold paper & Bazzill navy (not sure of the color name). The striped background paper is by Reminisce. It's the same paper I used on my table under my tags yesterday. It was perfect for this card!
No, I didn't stay up all night to finish this card.........I went to bed after I stamped the images & colored the backgrounds. I put the card together on my lunch today at the store.
Hope it brings you joy & inspiration!
-Judy

Wednesday, October 1, 2008

Tags, Tags, Tags.......

I had fun over the weekend making holiday gift tags!

First of all, I must give Shari Carroll credit for the idea for these little tags. Shari is one of the Hero Arts designers. You can check out her designs on her blog here.

It all started with some leftover labels that I had used for the name tags for the workshop demonstrators. The labels were ordinary 1" x 2 5/8" printer address labels. I inked a large Christmas background stamp with Brilliance Moonlight White & stamped over the labels. Then I heat set the ink. I used Distress ink from a re-inker & water in a Mini Mister to spray color over the labels. The stamped image resisted the color for a beautiful subtle background.

To make the tags, I cut strips of white paper 1.25" x 6.5" to fold in half. I added the label, a tiny verse (Hero Arts Gift For You small clear set), some embellishments, punched a hole & added a ribbon. On some, I used glitter to highlight some of the background. What a fun way to use up bits & pieces of ribbon & extra embellishments!

The center tag has the poinsettia & vines background from Hero Arts. The tiny trees are from Hero Arts Far Out Holiday set. It's the same set with the robot. The bright red tree brad & felt poinsettia are from Creative Impressions.


The background on the these tags is a stamp by Penny Black called Snow Scroll. I used Distress Broken China & water in the Mini Mister. I added glitter to the snowflake brads.

(The paper in the background & under the tags is from Reminisce.)